
SailPoint ISC + Okta SSO Integration with JIT
Date Posted:
Category:
Security
Author:
Gopi
SailPoint ISC + Okta SSO Integration with JIT
Date Posted:
Category:
Security
Author:
Gopi
SailPoint ISC + Okta SSO Integration with JIT
Date Posted:
Category:
Security
Author:
Gopi
Get your Tailored Quote for your Organisation
Get your Tailored Quote for your Organisation
Get your Tailored Quote for your Organisation
SailPoint ISC + Okta SSO Integration with JIT Provisioning: A Step-by-Step Guide
Introduction of Sailpoint ISC + Okta SSO Integration with JIT
This guide outlines how to configure SailPoint Identity Security Cloud (ISC) as a Service Provider (SP) and Okta as an Identity Provider (IdP) using SAML. It also covers enabling Just-In-Time (JIT) provisioning to automatically create user identities in SailPoint when they first log in through Okta.
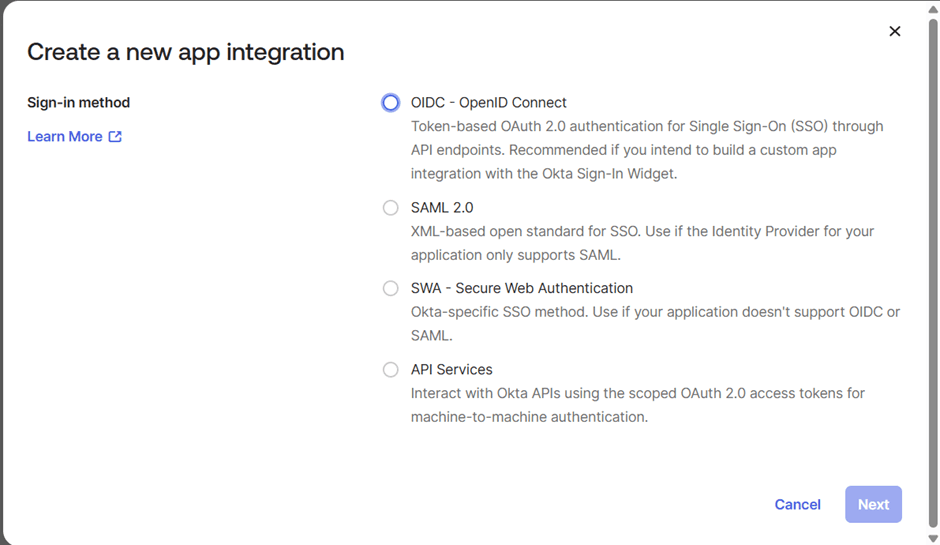
Step 1: Create SAML Application in Okta
Navigate to Admin > Applications > Create App Integration
Choose SAML as the sign-on method
Enter App Name and upload logo (optional), then click Next
Step 2: SAML Configuration in Okta
Single Sign-On URL: Paste SAML URL from SailPoint ISC
Audience URI (SP Entity ID): Paste Entity ID from SailPoint ISC.

Define Name ID format if required
Set Application Username using standard or custom expression (e.g., user.middleName + '.' + user.middleName)
Click Next, then Finish.
Step 3: Get Identity Provider Details from Okta
Go to the app’s Sign-On tab
Click View SAML setup instructions
Copy the following:
Identity Provider Single Sign-On URL
Identity Provider Issuer
X.509 Certificate (Download it).
Step 4: Configure SailPoint as Service Provider
Go to Admin > Global > Security Settings > Service Provider in SailPoint
Under Identity Provider Settings:
Paste Issuer into Entity ID
Paste SSO URL into both Login URL (POST) and Login URL (Redirect)
Use Okta’s sign-in URL for Logout URL.

Import the X.509 Certificate.
Click Save
Step 5: Assign App to Users in Okta
Go to Admin > Applications > [SailPoint App] > Assignments
Click Assign > Assign to People or Assign to Groups
Users can now launch the SailPoint app from the Okta dashboard.
Step 6: User Login Behavior
If identity exists in SailPoint, user is logged in via SAML SSO
If accessing SailPoint directly (e.g., https://dev-03439048-admin.okta.com/), user is redirected to Okta login
Bypass URL for admins and optionally users: https://<your-isc-domain>/login/login/?brand=default&prompt=true
Enable remote identity provider after saving settings

Step 6.1: Test SSO Integration
Log in as an assigned user through the Okta dashboard
Click the SailPoint app icon from the end user dashboard to initiate the SAML SSO flow
Verify that you are automatically redirected and logged into SailPoint ISC without entering credentials
Test logout redirection to ensure the session ends and redirects to the Okta login page.
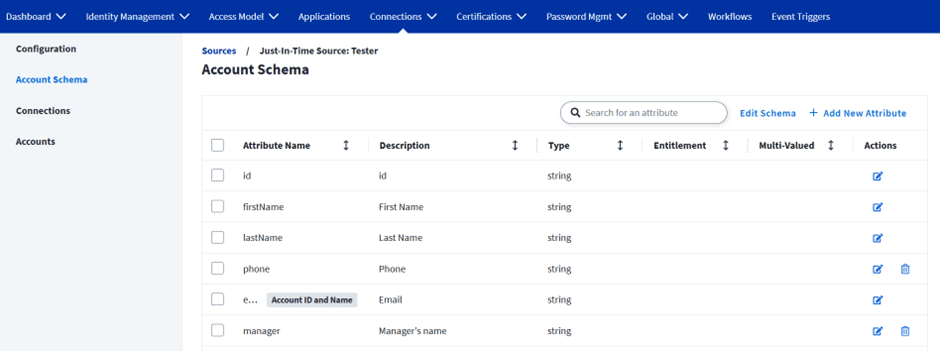
Step 7: Create JIT Source in SailPoint
Go to Admin > Connections > Sources > Create New
Choose SAML Just-in-Time Provisioning > Configure
Enter name, description, and source owner
In Account Schema, add:
id, firstName, lastName, email, phone, manager.
Step 8: Create Identity Profile for JIT Source
Navigate to Admin > Identity Management > Identity Profiles > Create New
Enter name and select the JIT source
After creation, view profile under Connections tab of the JIT source.

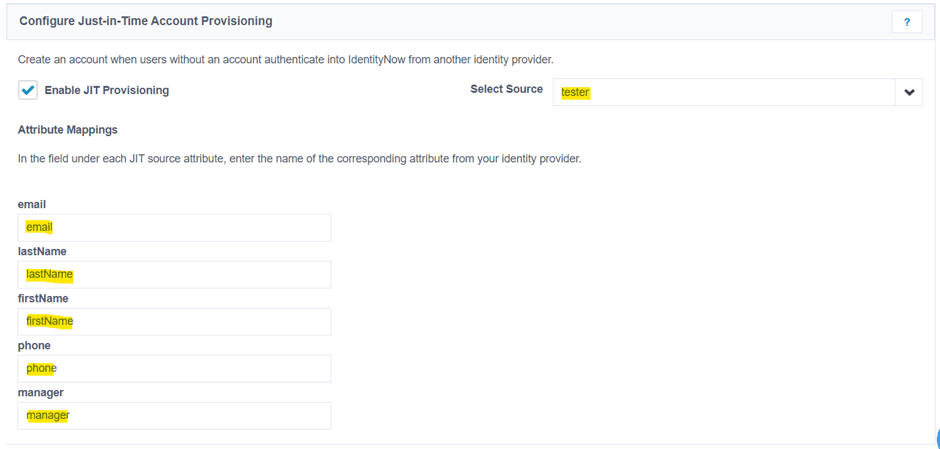
Step 9: Map Attributes from Okta to SailPoint
Ensure attribute names match exactly between Okta and SailPoint
In SailPoint Service Provider Settings, enter Okta attribute names.
Step 10: Add Attribute Statements in Okta
Go to Admin > Applications > [SailPoint App] > General > SAML Settings > Edit
Under Attribute Statements, add required fields:
firstName, lastName, email, etc.
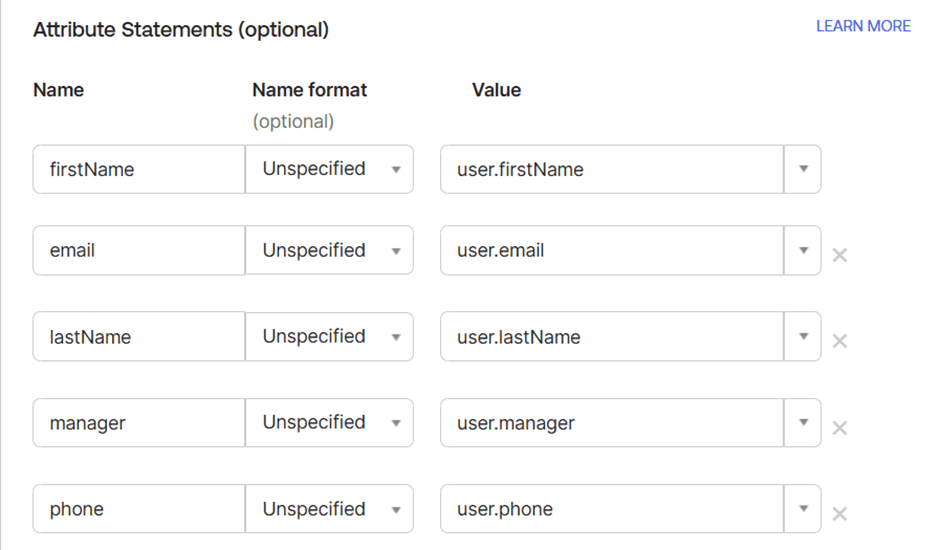
Click Next, then Finish.
Step 11: Test JIT Provisioning
In Okta: Admin > Directory > People > Add Person
Fill details and click Save
Assign SailPoint app to this new user
Log in to Okta with the new user account
Launch SailPoint app from user dashboard
If identity doesn’t exist, SailPoint will automatically create identity using JIT and log user in.
Conclusion
This configuration enables secure, seamless access to SailPoint ISC using Okta SAML SSO, with JIT provisioning for new users. It simplifies identity management, reduces manual onboarding, and improves user experience.
SailPoint ISC + Okta SSO Integration with JIT Provisioning: A Step-by-Step Guide
Introduction of Sailpoint ISC + Okta SSO Integration with JIT
This guide outlines how to configure SailPoint Identity Security Cloud (ISC) as a Service Provider (SP) and Okta as an Identity Provider (IdP) using SAML. It also covers enabling Just-In-Time (JIT) provisioning to automatically create user identities in SailPoint when they first log in through Okta.
Step 1: Create SAML Application in Okta
Navigate to Admin > Applications > Create App Integration
Choose SAML as the sign-on method
Enter App Name and upload logo (optional), then click Next
Step 2: SAML Configuration in Okta
Single Sign-On URL: Paste SAML URL from SailPoint ISC
Audience URI (SP Entity ID): Paste Entity ID from SailPoint ISC.
Define Name ID format if required
Set Application Username using standard or custom expression (e.g., user.middleName + '.' + user.middleName)
Click Next, then Finish.
Step 3: Get Identity Provider Details from Okta
Go to the app’s Sign-On tab
Click View SAML setup instructions
Copy the following:
Identity Provider Single Sign-On URL
Identity Provider Issuer
X.509 Certificate (Download it).
Step 4: Configure SailPoint as Service Provider
Go to Admin > Global > Security Settings > Service Provider in SailPoint
Under Identity Provider Settings:
Paste Issuer into Entity ID
Paste SSO URL into both Login URL (POST) and Login URL (Redirect)
Use Okta’s sign-in URL for Logout URL.
Import the X.509 Certificate.
Click Save
Step 5: Assign App to Users in Okta
Go to Admin > Applications > [SailPoint App] > Assignments
Click Assign > Assign to People or Assign to Groups
Users can now launch the SailPoint app from the Okta dashboard.
Step 6: User Login Behavior
If identity exists in SailPoint, user is logged in via SAML SSO
If accessing SailPoint directly (e.g., https://dev-03439048-admin.okta.com/), user is redirected to Okta login
Bypass URL for admins and optionally users: https://<your-isc-domain>/login/login/?brand=default&prompt=true
Enable remote identity provider after saving settings
Step 6.1: Test SSO Integration
Log in as an assigned user through the Okta dashboard
Click the SailPoint app icon from the end user dashboard to initiate the SAML SSO flow
Verify that you are automatically redirected and logged into SailPoint ISC without entering credentials
Test logout redirection to ensure the session ends and redirects to the Okta login page.
Step 7: Create JIT Source in SailPoint
Go to Admin > Connections > Sources > Create New
Choose SAML Just-in-Time Provisioning > Configure
Enter name, description, and source owner
In Account Schema, add:
id, firstName, lastName, email, phone, manager.
Step 8: Create Identity Profile for JIT Source
Navigate to Admin > Identity Management > Identity Profiles > Create New
Enter name and select the JIT source
After creation, view profile under Connections tab of the JIT source.
Step 9: Map Attributes from Okta to SailPoint
Ensure attribute names match exactly between Okta and SailPoint
In SailPoint Service Provider Settings, enter Okta attribute names.
Step 10: Add Attribute Statements in Okta
Go to Admin > Applications > [SailPoint App] > General > SAML Settings > Edit
Under Attribute Statements, add required fields:
firstName, lastName, email, etc.
Click Next, then Finish.
Step 11: Test JIT Provisioning
In Okta: Admin > Directory > People > Add Person
Fill details and click Save
Assign SailPoint app to this new user
Log in to Okta with the new user account
Launch SailPoint app from user dashboard
If identity doesn’t exist, SailPoint will automatically create identity using JIT and log user in.
Conclusion
This configuration enables secure, seamless access to SailPoint ISC using Okta SAML SSO, with JIT provisioning for new users. It simplifies identity management, reduces manual onboarding, and improves user experience.
Stay tuned to our blog to see more posts about
Sailpoint products implementation and its related updates.
Stay tuned to our blog to see more posts about SailPoint products implementation and its related updates.
Category:
Category:
Security
Security
SailPoint ISC + Okta SSO Integration with JIT Provisioning: A Step-by-Step Guide
Introduction of Sailpoint ISC + Okta SSO Integration with JIT
This guide outlines how to configure SailPoint Identity Security Cloud (ISC) as a Service Provider (SP) and Okta as an Identity Provider (IdP) using SAML. It also covers enabling Just-In-Time (JIT) provisioning to automatically create user identities in SailPoint when they first log in through Okta.
Step 1: Create SAML Application in Okta
Navigate to Admin > Applications > Create App Integration
Choose SAML as the sign-on method
Enter App Name and upload logo (optional), then click Next
Step 2: SAML Configuration in Okta
Single Sign-On URL: Paste SAML URL from SailPoint ISC
Audience URI (SP Entity ID): Paste Entity ID from SailPoint ISC.
Define Name ID format if required
Set Application Username using standard or custom expression (e.g., user.middleName + '.' + user.middleName)
Click Next, then Finish.
Step 3: Get Identity Provider Details from Okta
Go to the app’s Sign-On tab
Click View SAML setup instructions
Copy the following:
Identity Provider Single Sign-On URL
Identity Provider Issuer
X.509 Certificate (Download it).
Step 4: Configure SailPoint as Service Provider
Go to Admin > Global > Security Settings > Service Provider in SailPoint
Under Identity Provider Settings:
Paste Issuer into Entity ID
Paste SSO URL into both Login URL (POST) and Login URL (Redirect)
Use Okta’s sign-in URL for Logout URL.
Import the X.509 Certificate.
Click Save
Step 5: Assign App to Users in Okta
Go to Admin > Applications > [SailPoint App] > Assignments
Click Assign > Assign to People or Assign to Groups
Users can now launch the SailPoint app from the Okta dashboard.
Step 6: User Login Behavior
If identity exists in SailPoint, user is logged in via SAML SSO
If accessing SailPoint directly (e.g., https://dev-03439048-admin.okta.com/), user is redirected to Okta login
Bypass URL for admins and optionally users: https://<your-isc-domain>/login/login/?brand=default&prompt=true
Enable remote identity provider after saving settings
Step 6.1: Test SSO Integration
Log in as an assigned user through the Okta dashboard
Click the SailPoint app icon from the end user dashboard to initiate the SAML SSO flow
Verify that you are automatically redirected and logged into SailPoint ISC without entering credentials
Test logout redirection to ensure the session ends and redirects to the Okta login page.
Step 7: Create JIT Source in SailPoint
Go to Admin > Connections > Sources > Create New
Choose SAML Just-in-Time Provisioning > Configure
Enter name, description, and source owner
In Account Schema, add:
id, firstName, lastName, email, phone, manager.
Step 8: Create Identity Profile for JIT Source
Navigate to Admin > Identity Management > Identity Profiles > Create New
Enter name and select the JIT source
After creation, view profile under Connections tab of the JIT source.
Step 9: Map Attributes from Okta to SailPoint
Ensure attribute names match exactly between Okta and SailPoint
In SailPoint Service Provider Settings, enter Okta attribute names.
Step 10: Add Attribute Statements in Okta
Go to Admin > Applications > [SailPoint App] > General > SAML Settings > Edit
Under Attribute Statements, add required fields:
firstName, lastName, email, etc.
Click Next, then Finish.
Step 11: Test JIT Provisioning
In Okta: Admin > Directory > People > Add Person
Fill details and click Save
Assign SailPoint app to this new user
Log in to Okta with the new user account
Launch SailPoint app from user dashboard
If identity doesn’t exist, SailPoint will automatically create identity using JIT and log user in.
Conclusion
This configuration enables secure, seamless access to SailPoint ISC using Okta SAML SSO, with JIT provisioning for new users. It simplifies identity management, reduces manual onboarding, and improves user experience.
Stay tuned to our blog to see more posts about
Sailpoint products implementation and its related updates.
Category:
Security


