
Migrate SailPoint Roles Using Visual Studio
Date Posted:
Category:
Security
Author:
Kanibharathi
Migrate SailPoint Roles Using Visual Studio
Date Posted:
Category:
Security
Author:
Kanibharathi
Migrate SailPoint Roles Using Visual Studio
Date Posted:
Category:
Security
Author:
Kanibharathi
Migrating SailPoint Roles Across Environments Using Visual Studio
The creation and development of roles will occur in the Dev or Sandbox instance of SailPoint. In a project, we always have more than one environment. It is not possible to create all the roles in each environment. For that, we used Visual Studio to import and export roles from one environment to another.
Steps:
Install ISC Extension in Visual Studio
In Visual Studio, click ISC -> “+”. It needs the PAT secret and PAT ID for every context. There is no limit on the number of tenants that can be added to VSCode.

After the tenants are added. You can find the tenants and the available objects in the Identity Security Cloud module.
Choose the environment from where the roles need to be migrated. Usually, the roles are created in the Dev Instance.
Go to roles. Verify that all roles configured in the UI are there.
Click export
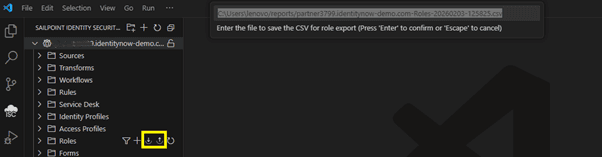
The file will be saved in CSV format. Make note of the location of the file.
Note: Don’t open CSV in Microsoft Excel. Always go for Notepad or VS Code.
This is the sample of the Exported CSV file.

Copy the roles that need to be migrated and create a separate CSV file.
All the attributes that are configured can be migrated to different environments.
Import the CSV in other environment. For example, if the roles are created in Dev, we can import the same file to other environments like Test, Val, and Prod.
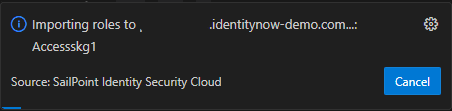
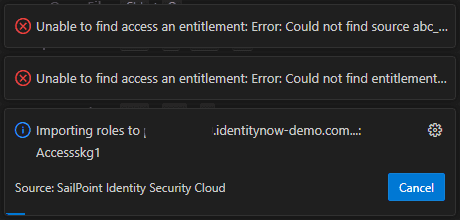
All the roles will be imported. If there is an error in the file, the details can be found here. Verify those roles and import the file again
This VS Code method proves to be an efficient and scalable approach, especially when managing a large number of roles. Even though it is highly effective for migrating roles from one environment to another, it can also be used to create new roles in SailPoint environment. We have to prepare the CSV as we created for migration and import the file. By following this document, developers can ensure consistency, accuracy, and time efficiency during role migration or creation activities.
Stay tuned to our blog to see more posts about
Sailpoint products implementation and its related updates.
Stay tuned to our blog to see more posts about
Sailpoint products implementation and its related updates.
Category:
Security
Stay tuned to our blog to see more posts about
Sailpoint products implementation and its related updates.
Stay tuned to our blog to see more posts about
Sailpoint products implementation and its related updates.
Category:
Category:
Security
Security
Get your
Tailored Quote for your
Organisation
Get your
Tailored Quote for your
Organisation
Migrating SailPoint Roles Across Environments Using Visual Studio
The creation and development of roles will occur in the Dev or Sandbox instance of SailPoint. In a project, we always have more than one environment. It is not possible to create all the roles in each environment. For that, we used Visual Studio to import and export roles from one environment to another.
Steps:
Install ISC Extension in Visual Studio
In Visual Studio, click ISC -> “+”. It needs the PAT secret and PAT ID for every context. There is no limit on the number of tenants that can be added to VSCode.
After the tenants are added. You can find the tenants and the available objects in the Identity Security Cloud module.
Choose the environment from where the roles need to be migrated. Usually, the roles are created in the Dev Instance.
Go to roles. Verify that all roles configured in the UI are there.
Click export
The file will be saved in CSV format. Make note of the location of the file.
Note: Don’t open CSV in Microsoft Excel. Always go for Notepad or VS Code.
This is the sample of the Exported CSV file.
Copy the roles that need to be migrated and create a separate CSV file.
All the attributes that are configured can be migrated to different environments.
Import the CSV in other environment. For example, if the roles are created in Dev, we can import the same file to other environments like Test, Val, and Prod.
All the roles will be imported. If there is an error in the file, the details can be found here. Verify those roles and import the file again
This VS Code method proves to be an efficient and scalable approach, especially when managing a large number of roles. Even though it is highly effective for migrating roles from one environment to another, it can also be used to create new roles in SailPoint environment. We have to prepare the CSV as we created for migration and import the file. By following this document, developers can ensure consistency, accuracy, and time efficiency during role migration or creation activities.